如何将Parse SDK导入到Android Studio中使用
官方Github地址:https://github.com/parse-community/Parse-SDK-Android
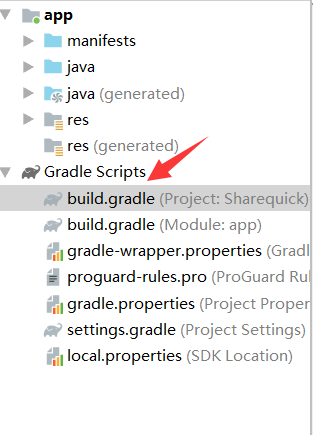
首先找到在你的项目目录下找到 build.gradle 文件
![如何将Parse SDK导入到Android Studio中使用]()
然后将 maven { url "https://jitpack.io" } 放到 repositories 里
然后添加所需要的库加入到 build.gradle (Module:app)这个文件
注意导入的时候要吧 latest.version.here 改成最细你的版本, 或者修改 $parseVersion 这个也可以
目前我写这个教程的版本是![如何将Parse SDK导入到Android Studio中使用]() 你也可以到官方Github上查看
你也可以到官方Github上查看
引用库完成后接下来就可以使用了
你可以在你的项目目录下新建一个 Application 然后写入以下代码
当然不能忘记在 manifests/AndroidManifest.xml 中修改
如果你的 your-server-address 不是https而是http,需要在 application 中加入 android:usesCleartextTraffic="true" 即可
然后你就可以愉快的做项目了
首先找到在你的项目目录下找到 build.gradle 文件
然后将 maven { url "https://jitpack.io" } 放到 repositories 里
allprojects {
    repositories {
        google()
        jcenter()
        maven { url "https://jitpack.io" }
    }
}
然后添加所需要的库加入到 build.gradle (Module:app)这个文件
ext {
   parseVersion = "latest.version.here"
}

dependencies {
    //Parse SDK 这个是必须要导入的
    implementation "com.github.parse-community.Parse-SDK-Android:parse:$parseVersion"
    // 支持谷歌登录/注册(可选)
    implementation "com.github.parse-community.Parse-SDK-Android:google:$parseVersion"
    // 支持Facebook登录/注册(可选)
    implementation "com.github.parse-community.Parse-SDK-Android:facebook:$parseVersion"
    // 支持Twitter登录/注册(可选)
    implementation "com.github.parse-community.Parse-SDK-Android:twitter:$parseVersion"
    // 用于FCM推送支持(可选)
    implementation "com.github.parse-community.Parse-SDK-Android:fcm:$parseVersion"
    // 对于Kotlin扩展支持(可选)
    implementation "com.github.parse-community.Parse-SDK-Android:ktx:$parseVersion"
    // 对于Kotlin协同程序支持(可选)
    implementation "com.github.parse-community.Parse-SDK-Android:coroutines:$parseVersion"
    // 支持RxJava(可选)
    implementation "com.github.parse-community.Parse-SDK-Android:rxjava:$parseVersion"
}
注意导入的时候要吧 latest.version.here 改成最细你的版本, 或者修改 $parseVersion 这个也可以
目前我写这个教程的版本是
引用库完成后接下来就可以使用了
你可以在你的项目目录下新建一个 Application 然后写入以下代码
import com.parse.Parse;
import android.app.Application;

public class ParseApplication extends Application {
    @Override
    public void onCreate() {
      super.onCreate();

      Parse.initialize(new Parse.Configuration.Builder(this)
        .applicationId("YOUR_APP_ID")
        // if desired
        .clientKey("YOUR_CLIENT_KEY")
        .server("https://your-server-address/parse/")
        .build()
      );
    }
}
当然不能忘记在 manifests/AndroidManifest.xml 中修改
<application
    android:name=".ParseApplication"
    android:usesCleartextTraffic="true"

    ...>
    ...
</application>
如果你的 your-server-address 不是https而是http,需要在 application 中加入 android:usesCleartextTraffic="true" 即可
然后你就可以愉快的做项目了